[[ header START ]]

Welcome to OS2.GURU site! (eComStation.RU)

Select your language: Russian English Deutch Spanish Italian Portuguese Czech Polish French

Frequently asked questions and answers:
telegram

Форум обсуждение

telegram

Send message

telegram

[ +7-981-8529467 (Санкт-Петербург)

telegram

t.me/os2_guru

eComStation.RU


ru · en · de · es · it · pt · cz · pl · fr
OS/2 - это совершенно другая операционная система для PC (ArcaOS, eComStation, IBM OS/2 Warp)
Программы, новости, статьи, поддержка пользователей, оборудование, вопросы и ответы.
 
[Что такое OS/2?  Новости  Установка  Обновление  
 
 
Применение  Будущее  Сообщество  Проекты  

[Как заработать в OS/2?

Как купить OS/2 дискету?

Идеи для фанатов OS/2

*

(Карта сайта)


[[ head-3-search ]]

Отчет: OS/2 совместимое оборудование

[[ head-3-search END ]]

 
Обновление

 
Программы

 
(Санкт-Петербург)

 
Преимущества (1)

 
Разработчику (1)

 
(Пайпы программ)

 
Компании: (1)

 
История (1):

 
(Бонусы)

 
Советы:

 
(Барьеры и решения)

 
Технологии: (1)

 
(Применение в науке, лаборатории, ..)


Готовые решения:

 
Новая eComStation:

 
Будущее: (1)

 
(Ссылки на другие сайты)

 
(Картинка дня)

 
Артефакты OS/2

 
Гаджеты

Overview Supported hardware Contacts Downloads
  Unsupported Forum Purchase
Publications Links Hall of Fame Success stories
 
Installation   |   Default method   |   Configuration   |   Kiddy method   |   NetDrive plugin   |   REXX library

Installation
 

Installation of ThirdEye is straightforward, as with ThirdEye 1.0.4 and above, it is packaged using the WarpIn installer which is available from http://www.xworkplace.org/proj_warpin.html

To install ThirdEye (once WarpIn has been installed) simply double click ThirdEye-1_0_4_demo.wpi and follow the prompts.

A "ThirdEye" folder is then created on your desktop. Double click "ThirdEye for OS/2" to launch ThirdEye.

Comments: If you don't like WarpIn, download .zip pack. Simply expand it to necessary directory (ex. C:\Treasure\ThirdEye\) and create ThirdEye object on the desktop manually.

 
Initial Configuration

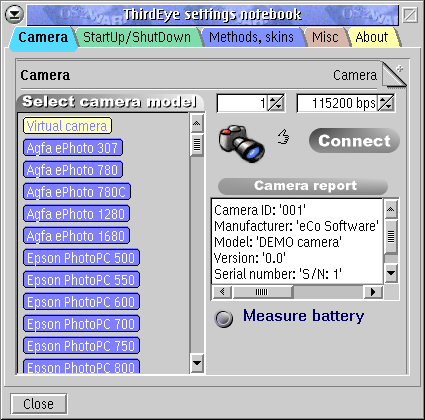
The first step is to configure your camera, by clicking the Setup icon at the top right hand corner of the ThirdEye window. Once the camera and com port and port speed are set, click Connect (with your camera connected and switched on) to verify that a connection to your camera can be established. If everything is setup correctly, you should get some text in the Camera Report box. 

Click to view full-size screenshot

Click through the other options in the settings notebook if you wish to change other ThirdEye settings. See the Configuration chapter for other settings description.

 
Troubleshooting

My camera is mentioned in the list of supported digicams, but I can't connect to it and download my photos. Why? 

There are several possible causes:

  1. You locked speed of COM-port. It's very useful for modems, but digicams don't operate when speed is locked. Digital cameras use different speeds when communicating with ThirdEye. Unlock speed before starting ThirdEye: If you use SIO driver and have in config.sys something like this:
    DEVICE=C:\SIO\SIO.SYS (COM2:57600) 
    then use tools from SIO directory: 
    SIO v 1.6: su.exe 2 lock 0 
    SIO v 2K: modes.exe com2 unlock 

  2. COM-port is locked by other application (mailer, terminal program). Exit other applications to unlock com-port.


надежная операционная система для PC (IBM OS/2 Warp) :: Статус сайта :: Цели создания сайта :: Карта сайта :: Контактная информация :: Гостевая книга
Загрузки: эта страница/весь сайт   eComStation.Ru
Добавьте этот баннер себе
© 2001, 2002 eComStation.Ru team

eComStation is a registered trade mark of
Serenity Systems